 |
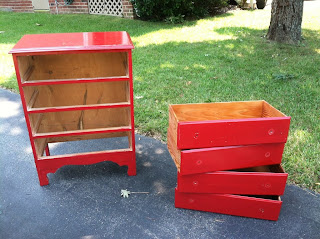
| Before |
This past summer we decided that the chest was once again garage sale material. It sat in our hallway waiting for someone to make the first move. I began to hunt for furniture for my house back at school and a dresser was at the top of my list. It sat right in front of me, but there was just no way I was going to use that offensively red piece of junk. But like any smart crafter, I knew there could be way I would use it. With the help of my mother, we turned the unwanted dresser into a striped, chic piece of beauty. Here's how we did it...
What you need:
- Electric/power sander
- Sand paper
- Painter's tape
- Dust mask (to wear when sanding and painting)
- Oil-based wood primer
- Plastic paint tray
- Foam rollers
- Paint brushes (I used 4 different sizes)
- 2 gallons of paint (2 different colors of choice)
- Ruler
- Sunglasses (to wear when sanding)
- Gallon of varnish
- Knobs (I purchased mine from Anthropologie on sale)
- Wax (I used a candle)
Instructions:
1. Remove drawers
2. Sand until the red paint has turned into dust and is covering your neighbor's yard
3. Sand some more to remove the original green coating
4. Apply primer - let dry over night
5. Apply the paint for the background color (I did 2 coats)
6. Let the paint completely dry!
4. Measure out the stripes and apply the painter's tape
5. Apply the paint for the stripes (I did 2 coats)
6. Remove tape carefully while paint is still wet
7. Let dry overnight (patience is truly a virtue)
8. Apply varnish for protection
9. Apply knobs
10. Rub corners with a sheet of sand paper (to give worn look)
11. Run the wax along the sides of the drawers (makes it easier to open and close - and prevents bloody lips)
 |
| Never ending sanding... |
 |
| Finished product! |
 |
| Mismatched knobs for some character! |
 |
| From the side |
The dresser has been my biggest project yet - it required a lot of sanding, painting, measuring, and patience! I spent around $50 total (not including the electric sander, sand paper, and paint brushes that I already had). Someone even asked me if they could buy it for $300!!! But this dresser is my pride and joy. And now every time I open a drawer to grab a pair of my running shorts, I have a flashback to my childhood - and that is priceless.
Good luck!
Beth

Awesome job! The dresser looks great!
ReplyDeleteLove your helper!
ReplyDelete